
How to use OffGrid MIDI controller (Unofficial Manual)

Drum Pads
By default, the OffGrid controller starts on note C2 (in the bottom left of the grid).
To use have the pads start at C1 (such as using with Ableton’s drum rack), simply press the “- Octave” button on the controller (the bottom left button of the 4 medium sized buttons on the left side of the controller). The button will turn yellow, signifying it is now using C1 as its’ root note.
You will need to find out what MIDI notes the drum pads use in your DAW of choice. See the “Instruments / Keys” section below to learn how to change not just the octave of OffGrid, but the root note itself.
If you want more drum kits for your DAW, check out our app, Kit Maker, which can automatically take your drum sample packs or Maschine Expansions and convert them into kit presets for a variety of software, such as Ableton, MPC, Beatmaker, Deluge and more.
Using OffGrid with Ableton: Ableton’s drum kits typically use the 16 pad range of C1 through D#2. However, by default, the OffGrid controller starts on note C2, which is an awkward place in the Ableton drum rack. Press the “- Octave” button once and it will line up with the Ableton drum rack. Remember to check out Kit Maker if you want more Ableton drum kits!
Instruments / Keys
By default, the OffGrid is in chromatic mode, which is the full range of keys on a keyboard. You can use the Lower/Higher octave buttons to control a higher or lower range of keys on the keyboard.
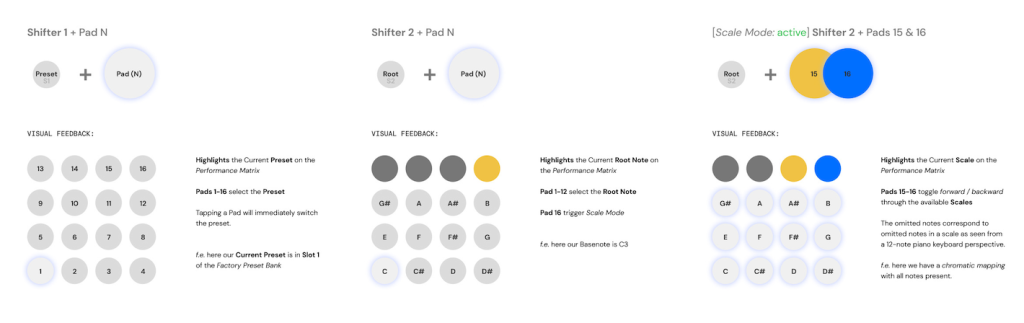
By default the root note is C2. To change the root note on the grid, hold the “Root” button (the lower of the two small buttons) and press one of the pads on the grid. For example, use the third pad in the bottom row; this would change the root of the grid to “D.” To change it back to C, hold the “Root” button and press the first (lower left) pad in the grid. See the visual guide to know which pad corresponds to which note.
If you own some sample packs and want to turn them into instruments for your DAW, check out our app Preset Maker, which can turn your melodic note sample files into instrument presets automatically!
Scale Mode
One powerful tool of OffGrid is it’s Scale Mode. Hold the “Root” button and press the top right yellow button on the pad grid. You will see the top grid pads turn yellow and blue, signifying you are in the Scale selection mode. All the lower white pads should glow white, showing you it is currently in Chromatic mode.
Continue holding “Root” and press the blue pad at the top of the grid to use the Major scale. Let go of the Root button and play the pads. you can hear the pads are now locked into the Major scale.
Go back into the scale selection mode (hold root and press the top right yellow button). Either press the yellow button to go back to Chromatic mode, or press the blue button to go to the next Scale option (which is the Minor scale). You can use these two buttons to go back and forth between the scales (note how the intervals of the notes light up white). Instead of pressing the yellow or blue buttons, you can also press one of the lower white buttons to choose a specific scale, which is useful for quickly getting to a scale without having to go back and forth.
Transport (Play / Stop / Record)
The green (top left) button on your OffGrid has two “states” and can map the two different actions to the same physical button. It uses CC 50 and CC 51 as MIDI messages depending on which “state” it is in.
Make sure to see the documentation of your DAW for the process of mapping MIDI control buttons. You may need to enable your DAWs ability to communicate to the controller in the preferences.
Turn on mapping mode of your software and map one state to the Play button of your DAW by pressing the top left button on your OffGrid. Map this same button to the Stop button of your DAW, and it should map to the other state. Once you have done this, pressing this button on your OffGrid should play and pause your DAW.
Mapping OffGrid Transport for Ableton Users
First go to your Ableton MIDI preferences and enable all MIDI communications with OffGrid.

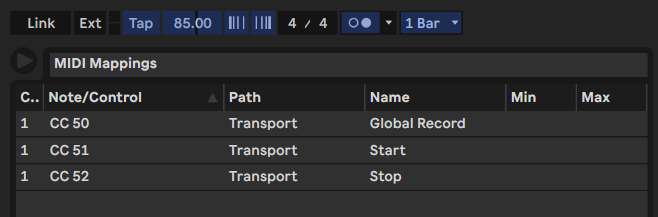
Then click “MIDI”, in the top right of your Ableton project, to begin MIDI Mapping mode. Click the button you want to map in Ableton, such as the Record icon button. Then press the physical Red button on your OffGrid controller. The button should now be mapped.
To map the Play and Stop buttons, you will need to first click the Play button in Ableton, then press the green button on your OffGrid. Now click the Stop button in Ableton, and press the same green button on your OffGrid. This button has two “states” and can map the two different actions to the same physical button.
Your Record, Play and Stop buttons should now be mapped!
In the left “MIDI Mappings” window in Ableton, you can see that the buttons have been mapped.
To exit MIDI Mapping mode, click again on the “MIDI” button in the top right of your Ableton project.
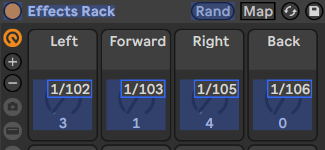
Gyroscope Tilt (Motion Performance)
Another unique feature of OffGrid is its’ gyroscopic MIDI control. This means you can tilt the controller in different directions and get have it send MIDI data that affects a filter on a synth, for example.
Starting with the controller sitting flat, tilting the controller sends these MIDI messages:
Tilt Left – CC 102
Tilt Forward – CC 103
Tilt Right – CC 105
Tilt Back – CC 106
Mapping these messages to your DAW is done in the same way as mapping the transport buttons, but because it is easy to accidentally tilt it in different directions, it may take a few times to assign your desired tilt movement to mapping.
For Ableton Users: Simply click the MIDI button in the top right of your Ableton project, click an Ableton macro or device control you want to affect, and tilt the controller in the direction you want to use. Then click the MIDI button again to exit the mapping mode. Be careful that your MIDI message was correct when you exited the mode. Now you can control your audio effects just by tilting the controller!
Joystick
By default, the joystick sends the following MIDI messages:
X Axis – CC 1 / ModWheel
Y Axis – Pitchbend
Change the behavior of the pads
OffGrid has a few different default setups for how the pads behave, such as changing the dynamic range, disabling aftertouch etc. The details of these options can be found on this page.
Update OffGrid Firmware
The OffGrid firmware is easy to update by connecting to your computer via USB and visiting a website. This page shows you the details of how to do it.
Connecting to your device
The OffGrid MIDI controller can connect to many different devices, including bluetooth. This page goes over all the ways you can connect.
Turn your sample packs into kits
Watch a short demonstration of how Kit Maker turns your sample packs into drum kit presets for your DAWs, such as MPC, Ableton, Beatmaker, Deluge and more.
Turn your sample packs into instruments
Watch a short demonstration of how Preset Maker turns your sample packs into instrument presets for your DAW.
Questions about OffGrid?
If you have any questions regarding the OffGrid, please refer to birdkids support and resources. This is the extent of our OffGrid knowledge and unfortunately cannot help you further.