
Some users may want to create very specific kit layouts that have a certain number of samples for each sample type. You may even want to exclude some sample types (no “Percussion” samples for instance). This is possible by changing the Kit Maker preferences.

Above you can see how I edited the sample values to have extra kicks and no percussion samples.
Note: Even after setting Percussion to 0, the pads will still read “Percussion” in the pad layout in Kit Maker. This is just because the pad labels are hardcoded into the app. The pads that still say “Percussion” (for example) are actually going to be used for other pad categories, depending on your “Samples for Kit” settings.
It may take some experimenting, but you should be able to set up Kit Maker to make the exact kits you want by following this guide.
Using different sample categories
Are you someone that does not use Open Hi Hats and would prefer to use 808 sub sounds? An example like this is perfectly possible and there are a couple ways to achieve it.
Method 1: Edit the Keywords
Simply go into the Keyword Folder Preferences, delete the keywords for Open HH and instead put in “808” or whatever other keywords you’d rather be using.
Note that the labels on the pads in Kit Maker will NOT update if you change which samples you use. However, you yourself can remember that you are using 808 sub samples instead of Open HH samples. In your mind, just remember “Oh it says ‘Open HHs’ but I changed those keywords to use 808 samples for my specific purposes.” Make a note of what you are using each category for. Rest assured that you still CAN use whatever samples you want, set the amount of sample types in each kit and choose where they are positioned in the layout.
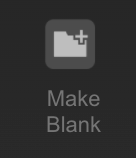
Method 2: Fill a Blank Sample Pack
An alternative to changing your keywords and processing existing sample packs is to leave the keywords as they are, but set up your own custom sample pack that works with the specific sample types you want to use.
Use the Make Blank button to make a blank sample pack folder. This will create a folder called Blank Sample Pack on your desktop and it already includes all the (empty) subfolder categories for you to fill with your own samples.
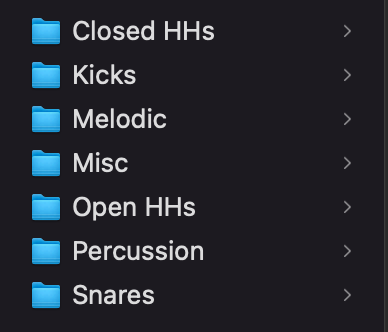
When working this way, leave the folder labels as they are, but use your own system of categories. For example, if you want to use “cat meow” sounds instead of Percussion sounds, fill the Percussion folder with your cat meow sounds. Then make a note that wherever a pad is labeled “Percussion”, this will actually use your cat sounds.
Change the sample amounts and pad layout
First, set the amounts of the samples you want in the preferences, without worrying too much about the layout yet. Make sure your sample pack has enough samples of each variety to create at least one kit in the way you want.

You can also turn off the option to “Fill All 16 Pads” if you want. Disabling this will keep strictly to your chosen layout, and not merge samples into empty pad spots. If you are trying to get very specific with your kit layout, you may also want to avoid including any “Misc” samples, which are a special sample type. The “Misc” samples category is sometimes used to “fill” in the gaps when there are empty pads in kits, so keep this in mind.
Go ahead and create some kits in a format that is easy for you to quickly test and look at the pad ordering in the output kits (Numbered files is a really easy format to test this with, as you can see exactly how your kits are going to be laid out, then delete the Numbered Files afterwards).
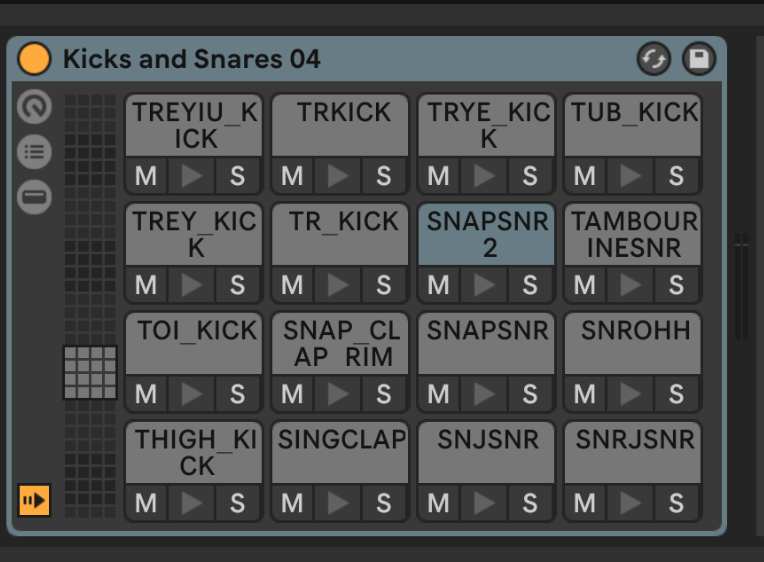
You weren’t able to visually see the custom-sample-amount pad order in the Kit Maker app earlier, but now that you have made some kits, check out the first kit that has been created and take a look. The kit should reflect the amount of each sample type you set up in the preferences. Take note of the ordering of the pads; this is the current ordering as defined by your Kit Maker preferences. If the top row came out all kicks, that means those are all kicks in your custom layout. Take a screenshot or make notes if you need.
The kit should have the exact amount of samples of each sample type you chose, but it may be out of order. This is easy to fix. If you found that Pad 1 had a Kick and Pad 9 had a snare, but you want to swap those sample types, go ahead and swap them in your custom layout. The next time you make your kits, they will be made with your new custom layout!
Most Kit Maker users do not require this detailed of a custom layout, but some users may have some specific use case that needs high levels of customization. It may take a few minutes to set up, but it should be possible to set up your layout exactly how you want.
If you need to go back and forth in between different custom setups, make sure to make a note of how you set it up correctly; the preferences can be edited at any time and once you know how to fine tune your setup, you’ll always be able to do it again.
There is also an option to reset the sample amounts back to default, and change the pad layout to one of the default layouts.